Sensor Cleaning Tutorial
August 28, 2010
Sensor Cleaning for Interchangeable Lens Cameras
It would be nice if camera bodies with interchangeable lenses sealed themselves during lens changes. Since they do not yet do this, there is always some dust or fibers which may sneak into the camera body during a lens change. The dust and fibers are then attracted to your sensor like a magnet because of the charge the sensor carries when it captures light. Dust which is not on the focal plane is usually not noticeable in photographs. So for instance a little dust on the end of your lens or dust in the camera body but not on the sensor will not be noticeable. However as soon as that dust or fiber sticks to your sensor then it will for sure show up on your photos as a dark spot.
This is a solved problem right?
The short answer is no. Many new cameras incorporate either a system to shake the sensor or to electrically push the dust off the sensor. The dust and fibers however are still in your camera body where they can re-attach at a later time.
How do I know if I have dust on the sensor?
You might already know you do have dust but if you want to find out for sure then take a photo of the clear blue sky. Then download the photo and zoom in to 50-100%. If you see dark spots where there should be none, then you have dust on your sensor.
What do I need to do now?
These instructions are specific to the Canon 5D Mark II but can be used on any DSLR or even any camera with an interchangeable lens. However you will need to read your cameras manual to find out how to put it in “cleaning mode” and follow the instructions for that mode. Make sure your battery is fully charged before doing this.
What tools do I need?
You will need at least three things and a few more optional items. The three mandatory items are:
1) A good blower
I like the Giotto Rocket Air Blower which you can pick up for about $15 including shipping. Note: do not use canned air as it has propellant which can leave residue. Also be wary of CO2 as some canisters have lubricant.
2) Photographic Solutions Sensor Swabs for your sensor size. This is the most expensive part at $35-40 per 12-pack.
3) Eclipse Optic Cleaning System Cleaning Fluid Note: This stuff is extremely flammable so you can only buy it in person in the store. If you don’t live in New York then you’ll have to find it at a local camera store. One bottle lasts a long time.
4) Optional: Sensor scope or magnifying loupe. These can get pricey and this one is $75. It does help in visualizing the problem though so you know where to concentrate the blower.
A Primer on sensors
It does not matter if you have a CCD or a CMOS sensor. The sensor always has a protective glass over it and it is this glass that you will be cleaning. Canon incorporates a low-pass filter in this as well to remove infrared light. Other manufacturers don’t do this. However the cleaning method remains the same regardless. While the glass is not delicate, it can be scratched so that is why care needs to be taken to prevent contamination anytime you will be physically contacting the sensor glass. Since it rests on the focal plane, any markings will be visible. If your sensor glass is damaged already, it is possible to repair although it is expensive. Contact the service department for your specific manufacturer to find out your options.
Let’s get started already!
The first thing I will say about this process is that it is best done in a clean room. If you take your camera to the manufacturers service center then this is what they do. Since most people I know don’t own clean rooms then a closed off room will have to do. If you have an air filter, turn it on high for about an hour ahead of time and then turn it off right before to let the air calm and the dust settle. If you have pets, kick them out. The last thing you need is your dog wagging his tail and some fur flying into your camera body.
1) Detach your lens and cap the end and temporarily put your body cap on the camera. Then put your camera in “Cleaning Mode”. Note: This is different from “clean the sensor now”. Like I mentioned before, every camera is different but to see how to do it for the Canon 5D Mark II just watch the video below. Lastly take off the body cap. You should notice that the mirror is now out of the way (if your camera has a mirror).
2) Grab your blower and proceed with blowing any dust and fibers out of the camera body. It is possible that you can clean the sensor only using the blower but if you cannot, it is still a good step to include. Blow as much out as you can while being careful not to touch the blower tip to anything in the camera including the sensor or the mirror.
3) Take one sensor swab and the sensor fluid and place it next to the camera. Now carefully open the sensor swab making sure not to touch the end with the swab on it. Apply a drop of liquid on each side of the sensor swab. Now firmly but gently swipe the swab from the left to the right of the sensor glass. Then make one swipe from the right to the left using the clean side of the swab. Now the swab is used and cannot be used again so just put it down anywhere. Once you put the body cap or your lens back on then you can take your camera out of “cleaning mode”.
Time to test the results
Place a wide angle lens on the camera if you have one and go outside. Aim at a clear blue sky up at about 75 degrees and opposite from the sun. Take several photos at the widest angle and then download them and look at them between 50-100%. You should not notice any dust but if you do you can repeat the steps. Sometimes just using the blower again can fix the problem.
Enjoy!
Use your newly cleaned camera often. It may get dirty again but you now know how to clean it. This should lead to a much more enjoyable experience. If you end up with an impossibly to clean sensor then you might want to take it to the manufacturers service center.
Photo 191: Truth Is Stranger Than Fiction with CS5 Tutorial
May 23, 2010
Jamie and I have been pushed to do more creative work in our latest class then any of the previous classes we have taken. The most recent example being our “Truth is Stranger than Fiction” assignment. We each had creative blocks for a fairly long time before we came up with the ideas for our individual projects. Once we each decided on what to do the next challenge was taking the photos and editing them in the amount of time left. I personally was limited in that I didn’t have access to a pickup truck and so I relied heavily on the abilities of Photoshop for post production work. In the paragraphs to follow I will take you through the steps I took to make just one of my images. I will also tell you what I would have done (and may still do) to correct some of the less successful images.
The Premise:
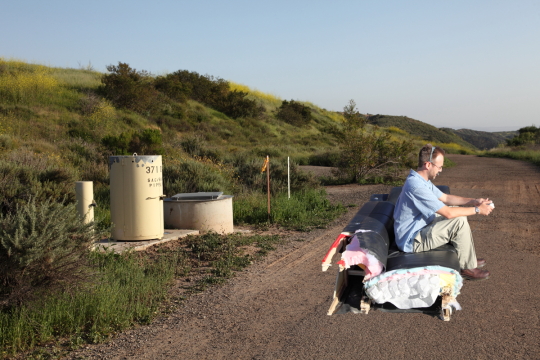
My idea for the project was to take photos of myself on a couch that I am in the process of disassembling in my garage in various locations where you would not expect to find a couch. In addition I would be staring off into something out of the frame and have a gaming controller in my hands and a headset on. Seeing as I was crunched for time and didn’t have a truck I decided to take the background shots separately from the subject shots of me on the couch and then merge the two into a composite image in post production. This proved to be a difficult task as you can imagine.
The Execution:
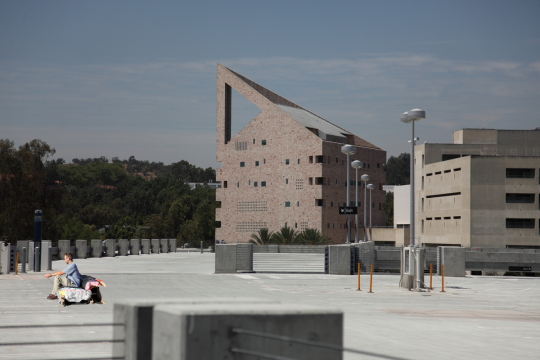
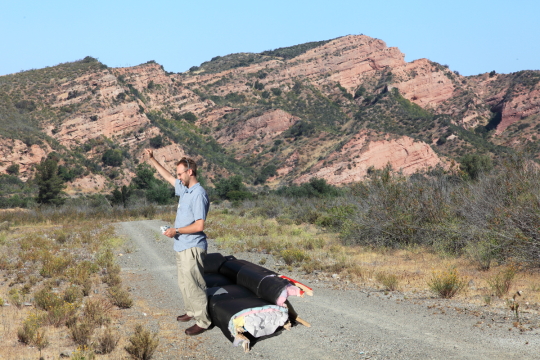
The first step was for me to take the photos for the background settings. I wanted to choose settings where it would be strange for a couch to be sitting in the foreground. In addition I needed photos which had an empty space for me to place the subject. I took two such shots and then went into my massive library of images to find the other four. Fortunately I had many images with empty ground in the foreground. Why I have these photos, I don’t know but it worked out. Next I needed to take the shots of the subjects.
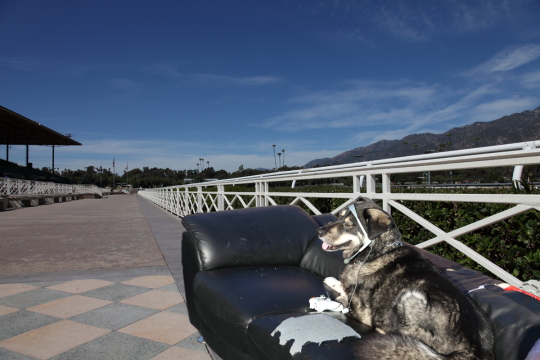
I dragged my old couch out of the garage and set up the shots. I put it in direct sun but didn’t worry about the background. I set up the shots but I had Jamie help with actually pressing the shutter while I posed. How the shots were composed did not matter as much as getting the couch in the frame. Once we got the shots of myself I posed the dog and stood behind him while holding his leash. The next step was post-production where all the magic happens.
Post-Production:
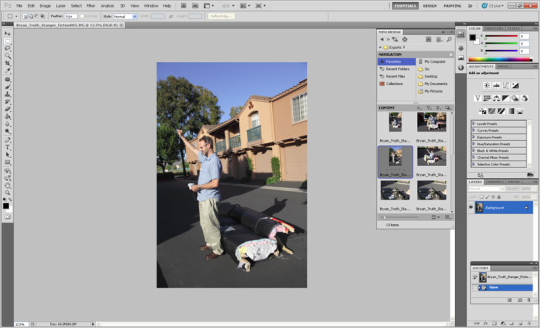
The first step was to mask just the subject out of the photo so it could be placed in the background shot. I started this in Photoshop CS4 trial and during the process the trial ran out. I purchased Photoshop CS5 Extended and downloaded the trial to get me through the time between when I ordered it and when it arrived. This was actually good because the “quick selection” tool and “refine edge” dialog box became even better in CS5.
Something you can see in the photo is the new “Mini Bridge” which lets you browse as you would in Bridge except within Photoshop. One note is that if Bridge is not already running then it will need to start in order to show “Mini Bridge”.
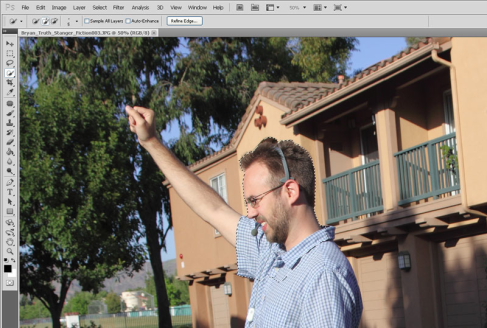
I used the quick selection tool to select the subject. There are a few tricks to using this tool successfully. The first is to understand the two means of controlling how much it selects. These means are: 1) reduce or enlarge the brush size and 2) zoom in and move the tool more slowly. Another tip is to remember that it is called “Quick Selection” for a reason. There are times when you need to fix things with the lasso tool or other times when the magic wand works better. You should remember though that by default the quick select tool adds to your selection but you can just as easily use it to remove from your selection.
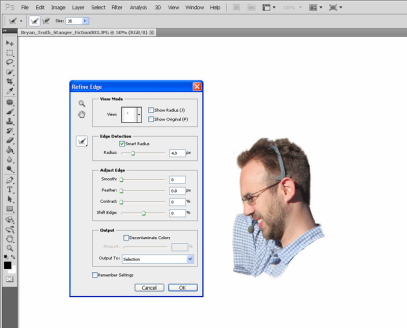
The next step I took was “Refine Edge”. You can access this by going to Select–> Refine edge or by clicking the “Refine Edge” button which is visible when using the quick selection tool. You can use this tool to expand the area of edge detection, smooth the edges of a selection, feather the transition of the selection edge, or adjust the contrast of the selection edge. The most useful part of this tool for me is the ability to expand the radius of edge detection as it is a really easy way to get a good selection of hair, fur or other uneven edges.
There are a few new options in this dialog box in the CS5 version. These include the “Smart Radius” check box, the ability to paint to expand the refine edge radius in certain areas, and the “Decontaminate Color” check box and slider. The “Smart Radius” check box will contract the maximum radius of the edge detection in areas where it does not need to be so large. If you need more control, you can now paint in to add to or remove areas of edge refinement. Lastly, “Decontaminate Color” will actually change the color of pixels to get rid of background color seeping through or light from a nearby object which reflected onto the edge of your selection. If you use this option then you are forced to output to a new layer as some of the original image information is destroyed/changed.
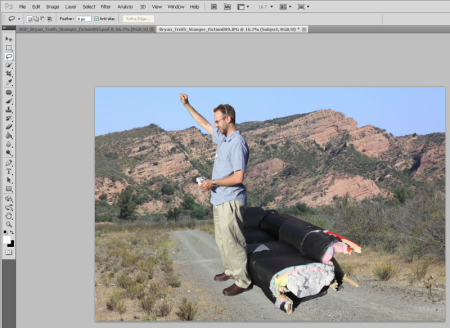
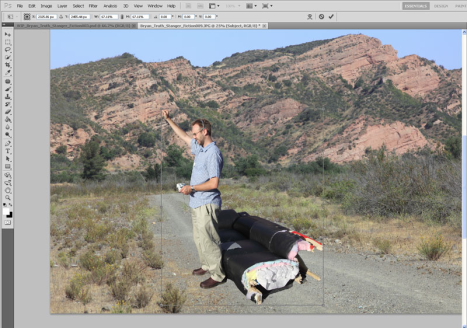
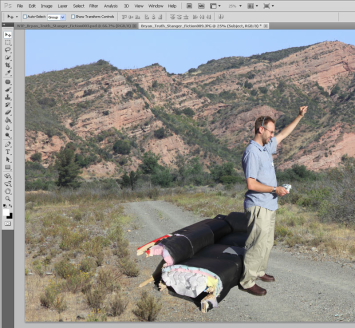
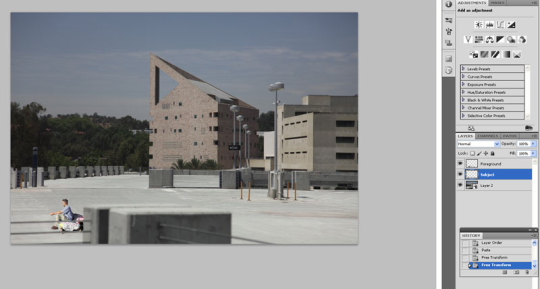
Once I completed masking out the subject (myself and the couch) I simply copied the image information and pasted it into the background of the new image as a new layer. This results in the object in the new layer being much too large in this context. In order to re-size the subject you can go to edit–> Transform–> Scale. Then hold shift as you change the size of the object. Holding shift maintains the aspect ratio as your re-size. You can also drag the object around while in this mode.
For this image this completed everything I did. Now the success of the image at this point depends on the quality of your selection as well as the way the lighting on each image matches or contrasts with each other. For instance this is how my image would look if I flipped the subject horizontally. You can do that from Edit–>Transform–>Flip Horizontally. Now the shadows are heading in the same direction, however I didn’t like this as much compositionally so I left it.
Depth of Field, Lighting, Shadows, and other challenges:
Some things which I needed to take into account in the project included lighting, shadows and depth of field. In this image I applied a blur to the subject because if it was completely sharp it would not make sense. This landscape shot had a focus point approximately at the hyper focal distance. This means things in the foreground have various levels of being out of focus. Still even with this applied this image appears just slightly unbelievable. To add to the realism I made a selection of just the foreground and pasted it in place on a new layer on top of the subject layer. Then I moved the subject so that it was sitting behind the foreground.
I realize that in order to fix all my shots I should have shot it in such a way as to eliminate shadows completely. Then the images where there was a shadow could be manipulated to reduce the contrast and exposure of the subject to match the background. Oh well, next time.
The final step that I could have taken to blend my images more convincingly would be to apply adjustments to the whole image. Here is what it would look like converted to Black and White with noise added.
What does it mean?
You might ask what does my project mean or what is it trying to convey. I guess it’s trying to convey that games transport you places. It could also be said to convey that people get sucked into gaming so deeply that they forget what is going on around them.
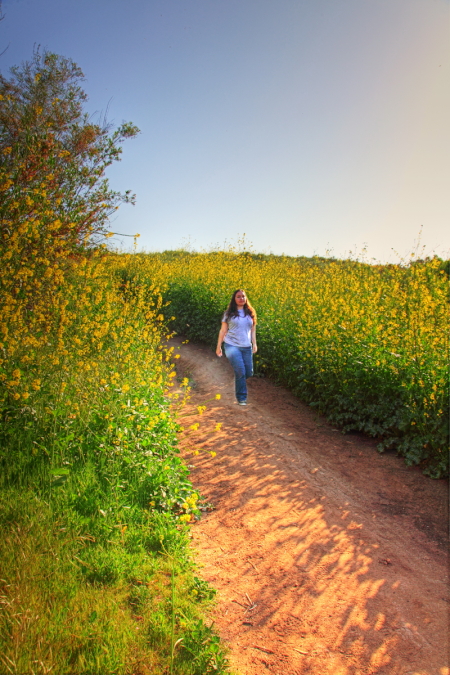
Jamie did the same project with a little bit different approach. She took multiple shots from the same angle and merged them together and then used layer masks to bring out the different locations of the subject. She also combined multiple images of the background at different exposures to create HDR (High Dynamic Range). Below is my completed project followed by hers.
Jamie’s Project
Gallery Search Tips
October 6, 2009
If you are reading this it is because you want more tips on searching the gallery. The gallery is organized into albums and you can of course navigate to an album and browse through the images. Some albums however have hundreds of images and this become tiresome. You just want your photo so here is how you find it. Click “search” at the top. By default it will search the title, the description and the keywords. Also by default it will match only images which contain all the words you search on. This is great for most searches. However sometimes you need to change things up.
For instance let’s say your bib number is 2009. Well a keyword on all events from 2009 is (yes you guessed it) 2009. However the number is not in the title of the image so you can search on only the title to find your photo.
Occasionally you may also want to change the operator from “AND” to “OR” to be more inclusive and find images containing any of the words you type. I can’t think of an example at this moment but you might want to do it.
Lastly, experiment. If you can’t find what you are looking for just experiment. As a final resort you can email me at bryan@shezphoto.com and I will search the actual image archive for the photo you are looking for.
Good searching!
Trail of Torment III
September 29, 2009
Update 10-6-2009 @ 9:11 PM: The photos are posted and tagged now. You can search for them by typing “Trail of Torment III” without the quotes followed by your bib number. If you think you are missing a shot you can also search for “Trail of Torment III no bib” without the quotes and you will see all the photos with obscured or missing bib numbers. For more tips and tricks see the page on searching the gallery.
Special Note: If you were the one wearing the “I’ve got the Runs” shirt and no bib you can find your photos by typing “got the runs from the Trail of Torment III in 2009” without the quotes.
You can access the gallery here. From here click on the search link at the top. Search always searches the entire gallery which is why it is important to include the event name.
All photos are posted uncropped. If you want to purchase a photo then click the “i” information icon ![]() for the image to get the file name and email your order to orders@shezphoto.com or bryan@shezphoto.com and we will respond back with a money request through Paypal. Alternately you may mail a check however this will delay your order until the check is received.
for the image to get the file name and email your order to orders@shezphoto.com or bryan@shezphoto.com and we will respond back with a money request through Paypal. Alternately you may mail a check however this will delay your order until the check is received.
If you want the image cropped or adjusted prior to us sending it to you let us know. We will send you the unaltered photo and throw in the cropped image with the sale for free.
Remember, you can access the gallery here and find out search tips here.
END UPDATE
On Sunday, October 4, 2009 @ 7:00 AM PST the Trail of Torment III race kicks off. With three different distances the event caters to just about every endurance athlete out there. If you are participating then you are in luck because this is the place where all of the race photography will be posted and sold.
Check back on this page after the event to see the photos as they are posted. All photos posted in the event gallery are released under the Creative Commons Attribution-Noncommercial-No Derivative Works 3.0 United States License which means they are free to use however you like so long as you give credit ONLY at the resolution posted and no higher. If you really want to own your photo outright with no restrictions and at Hi-Res then you can purchase the digital file for $5. We can send it to you in RAW, jpeg, tiff, psd, png, xcf, or almost any other format you like.
All photos will be shot with either a Canon 5D Mark II which features a 21.1-megapixel full-frame CMOS sensor or the Canon 50D which features an APS-C sized 15.1-megapixel CMOS sensor. Both will be paired with “L” lenses for superb image quality.
Make sure to check back here early and often for new information, updates, and of course your photos.
Vivian Creek Adventure Hike
August 16, 2009
A good friend of mine, Jay recently started what he terms “Adventure Friday”. See, he works Saturday but always gets Friday off. He already completed one major hike about a month ago and was looking to go on another. I took him up and we applied for a permit to hike the Vivian Creek trail which leads eventually to Mount San Gorgonio. As we set out on the trail I was excited and about as prepared as I thought I should be. I carried two liters of water plus an 8 oz chocolate Silk soy drink. Jamie made me two sandwiches and packed me trail mix, dried fruit, Shot Bloks, and Gu. Jay was even more prepared. He packed a full U.S. gallon of water plus he had trekking poles and a water filtration pump. More importantly, Jay is in much better shape then I am.
So we set out on our hike at a few minutes past 7AM. The trail starts flat, crosses a riverbed for Mill Creek and then shoots up into seriously steep switchbacks and loose rocky terrain. Jay and I were both feeling great as we crossed Vivian Creek and continued on a slight uphill. As we were going I mentioned to Jay that I smelled smoke but he couldn’t smell it at the time. We kept going and even though it was some seriously steep and technical hiking I was feeling great. We passed Half Way Creek feeling good. We continued up to another switchback which took us around to a great view of the valley. It was then that we could see the typical thermal inversion layer in the atmosphere and below it this cloud of thick black and orange smoke. This spooked Jay and concerned me as well. My first though was “let’s get away from the smoke”. I wanted to summit and then decide which side of the mountain to come down. If there was fire nearby we would see it and we could go down the other side. Jay reminded me that this would make it a 23 mile hike. “Good Point” I said and so we went down. We got about a mile and a half down or almost 1200 vertical feet and we happened across the first hikers we had seen on the trail so far. They didn’t know where the smoke came from but were not concerned. Then another couple came up and continued on. Jay and I decided it must be safe to continue so we went back up.
Smoke from the Santa Barbara County fires
Jay looking worried
The second time doing that ascent took it’s toll on me. We went slightly above where we turned around the first time and stopped to eat lunch. Then we continued on past High Creek. By this time I was really feeling it. We got a few hundred feet vertically above High Creek when I decided to call it quits. We could have reached the summit but we would have gotten back to the car around 7PM and I had no cell service to tell Jamie I would be late.
It felt really good to be going downhill and we made great time. Then my body just hit a wall and every step was a major effort. I had forgotten how steep the switchbacks above Mill Creek were. Jay lent me his trekking poles and that helped me get down. Then we crossed the creek and made it to the car. I was never happier to see a car in my life and I thought for a moment about kissing it’s steel skin; then I decided not to.
Be sure to check out my GPS information and the photos I took. Also make sure to check out Jay’s Adventure Friday blog here. Oh, by the way the fire was all the way up in Santa Barbara County and nowhere near us.
Part Dingo
August 13, 2009
In the tradition of one of our favorite photographers I’m including adorable photos of my Dog as a way to boost traffic to this site. Ok, well it’s not really my dog as it is my family’s dog and I’m pet sitting. The dog’s name is Mimi and one thing which has always troubled me is to find out just what kind of dog she is. You see I heard she was pure bred but she looks like a mut. I also heard she was Australian Shepherd but she looks nothing like those dogs except that they are about the same size but her fur is much shorter and courser and her coloring is both spotted and mixed.
For a long while I just assumed she must be a mut. That is, she must be a mixed breed. So one day I was playing Fallout 3 and decided to research the game a bit. I happen across this page. It says there is a dog companion in the game. It also mentions it’s the same breed of dog that plays in Mad Max 2 and more importantly mentions this dog is an Australian Cattle Dog of the Blue Heeler type. This is important as a neighbor recently conjectured that she might be a heeler. So this sent me to this page.
From here I found photos which match almost exactly to what Mimi looks like. She is a “Blue Heeler” color with very little red mostly in her undercoat on her head and some on her back thighs. Otherwise Mimi is entirely black and white with an almost perfectly black face. I learned many interesting facts about Australian Cattle Dogs like the fact that they are considered in the top ten of most intelligent dogs. In addition I learned they were bred by combining Collies with Dingos then mixing in some Bull Terrier and finally Dalmatian. The Dalmatian is responsible for the unique coloring of the dog as it passed a long a gene with basically guarantees they will have multiple colored fur. You can see from straight on the characteristic ears from the Dingo. An interesting note about Dingo is that it was a once domesticated dog which has reverted back to wild in order to survive roaming free in much of Australia.
So there you have it. Mimi is a great dog and companion and now I know from whence she has come.


